Tuesday, October 25, 2011

The Pistachio Fairy and The Crochet Hook Smuggler

Wow! It's been Soooooo long since my post! As some of you knew I have been involved with this year's pistachio harvest; working around the clock to bring delicious pistachios to grocery stores across the world...so that leaves no time for me to do anything but eat, sleep and breathe pistachios! I'm even going to be a pistachio fairy for Halloween, here's a picture of my magic wand to prove it:


Luckily, the madness of harvest is over and I am so happy to get back to my domestic ways! I already juiced the first pomegranates of the season and will be making jelly really soon! In case you missed it here is a link to my pomegranate jelly recipe. I've also go a few new recipes to try out that I'm super excited about!

But first...I need to take a rest. The jelly-making is going to have to wait because the Hubbz and I are taking a week long vaca in Oahu next week! Woohoooo, happy end of harvest to me :) I should be coming back with tons of ideas for Spam and pineapple recipes though so stay tuned!

As exciting as a trip to Oahu sounds, surprisingly the only thing on my mind has been trying to figure out how to smuggle my crochet hooks on the plane...Obviously the metal ones are out, but I'm thinking the wooden and plastic might be okay? I don't know, I haven't been on a plane since 2003, so I'm sure a lot has changed. If any readers have any smuggling tricks, other than how criminals conceal things...no hooks are entering ANY of my orifices, thank you very much. I'm desperate...but not that desperate. Think I may try using them as hair accessories...or sticking them inside my balls of yarn.

Anyhow, thank you to all my loyal readers who didn't give up on me! I promise, an actual post is coming soon!!

Follow-Up:
My friend Christa saves the day!
"Actually, having done this A LOT going back and forth to Oklahoma, I know that you actually CAN take all your knitting/crochet supplies (even metal ones) in carry-on to use during your flight -- including sharp scissors up to 4 inches in length! Here's the link: http://www.tsa.gov/travelers/airtravel/assistant/editorial_1252.shtm "-Christa
xo
Candice

Friday, September 2, 2011

Figs are not just for Newtons!

Up until yesterday, the only fig I've ever eaten was mixed with sugar and chemicals in the form of a certain cookie bearing its name. So yesterday, when my massage therapist offered me some white figs from her tree(in farm country, everyone has a garden or fruit tree), I thought..okay, why not? I'm adventurous enough.


I always give new fruits and veggies the "raw" test, by giving it a quick smell, cutting it open, and taking a small bite. My first impression of this fig was "Cool! Looks like a sea anemone!" It's green and squishy and has tentacle like insides. That was the science geek in me talking. Then my rational self took over...I would never eat a sea anemone.

I knew from the Fig Newtons, you were supposed to eat the seeds, since that is really the only thing in a fig newton that looks like it came from a fig; so I cut open this creature-like fruit and drug my teeth along the inside to scrape out the seeds and pulp. Not bad! Great texture! Then I ate the skin...also not bad! So why hadn't I ever thought about picking these up at the store before?

Got home from work early today (rare occurrence) so I thought I would play around with these figs a bit and wound up making one of the best things I've ever had. I made the most delicious fig jelly ever...Seriously, suck it Nabisco. It's really versatile too, right now I'm eating it with homemade tortilla chips and cream cheese, but it would also be good on toast, served with Brie and crackers, topping for Greek yogurt or ice cream, and probably 50 bazillion other options. I wish I had my own tree though because I only had enough to make about 1/2 pints worth...so not enough to can. :(

Here's the simple recipe:

Decadent White Fig Jam-Makes about 1/2 pint

12 white figs- finely chopped
1/2 cup of sugar
1/2Tbsp butter
Juice from 1/2 a lemon

Throw your figs in a food processor, or chop really fine. Meanwhile melt some butter in a pan. Add pureed fig, lemon juice and sugar to pan and cook on medium heat until it achieves a golden color (about 15 minutes) Let cool. and serve with cream cheese and homemade flour tortilla chips.

Monday, August 8, 2011

Zucchini Recipes and Crafty Drool-Fest.

My crochet projects have been going at a snail's pace these days; for one it's freakin' hot here and the last thing I want is for the wool shrug I've been working on to lay across my sweaty lap; Ew! Two, my poor little garden has needed much TLC this year, I think it's all the late season rain making the fungus, aphids, and worms go crazy and keeps me on guard every minute. I can't seem to get ahead! So, I have been longingly perusing the inter-web and dreaming of all the cool things I could be doing, rather than picking worms from my tomatoes and spraying the crap out of those asshole aphids. One thing that has seemed to develop immunity to the craziness, is my squash plants! Getting bored with the standard, sauteed or grilled zucchini rounds, I've gotten pretty creative to break up the monotony.

Have squash coming out of your ears (figuratively of course)? Try these simple recipes

At about 5 zucchini a week, my squash plants have given me the desire to add variation to the standard squash recipes out there! I still love the taste of squash, so I like minimal recipes that just enhance the flavor and texture of a good piece of squash.

My favorite way too cook it is by first, cutting the squash into thin little shoestrings, adding a little bacon grease to a skillet and sauteing with garlic salt, onion, and chili powder until browned on all sides. Makes a great side dish!

Another thing I love is grating the zucchini, sauteing with some diced tomato in some butter, then adding a a couple eggs and a little milk and scrambling. Great for breakfast, but also makes a great healthy side dish too.

Craft projects I'm dying to do
Check out this adorable recycled masterpiece! Introducing the Ruffled Jellyfish Explosion, Courtesy of Aunt Peaches. Click here for tutorial.
Trash bag chandelier!


Monday, July 18, 2011

Things I'm Lusting Over...

So, I've been a busy little bee making some pretty cute crocheted items, but I'm waiting for the time and energy to take proper pictures of them for the blog...so in the meantime, here are a few things that are definitely on my to-craft/to-make list!

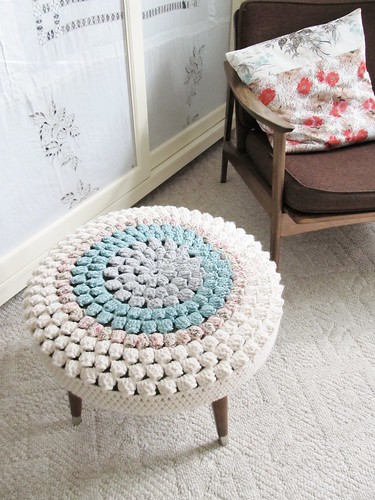
Dottie Angel's 'lo and beholdness' Stool Cover
This is so adorable, and turns any lame stool into a cute little masterpiece. Love this chick<3 


We Are Not Martha's  Cinnamon Toast Crunch Homemade Ice Cream.

For real! I'm totally making this this week.


A Bitchin' Kitchen's Homemade Oreos! 

Yes please! These look amazing.


Enjoy!

Friday, July 8, 2011

Holy Homemade Frijoles!

The other day I tried some refried beans at a baby shower at work...then I tried some more...and some more...until I was ashamed of myself. I asked my coworker why her beans were so amazing because mine are always...well...not this good!  She said her secret was instead of pinto beans, she uses Peruano ( Ped-U-wano) beans.

Native to South America, Peruano beans, also called canary beans, are one of the most common beans sold in Mexico City today and are a staple in traditional Mexican cooking. They are rich and buttery and more yellow in color than pinto beans. Her English is about as good as my Spanish, so through a translator I was able to get some sort of recipe, because of course, amazing cooks don't use recipes, they just know what it should look and taste like.

So, I'm trying these beans out for the first time and seeing how they stack up to my normal pinto refried beans--if your grocery store doesn't have these beans, you can use Northern beans, which are equally as yummy. The key, according to Maria, is to boil your beans with a whole onion and a few cloves of garlic, then flavor your oil with dried Arbol chiles...Gawd, my mouth is watering just typing this! Seriously, these beans will make you ooze back into your chair while your eyes roll to the back of your head. Anyone remember watching the show "Family Matters"? One of my favorite moments from that show is when Urkel is eating something delicious and Laura tries to ask him something; then he exclaims "Shhhhh! ...Not while I'm chewing!" This will inevitably be how you react when eating these beans and someone tries to get your attention. Okay, you've waited long enough! Here's the recipe:

Holy Frijoles
1 pkg dried Peruano beans (or Northern Beans)
1 Onion, cut in half
4 cloves garlic, peeled and cut in halves
2 Tbsp vegetable or canola oil
1 dried Chile de Arbol, or 2-3 dried serrano peppers
salt to taste


Rinse beans and pick out any deformed ones or rocks...yes rocks, it happens. Put in a large pan and cover with water, add onion and garlic and about a tbsp salt. Cover and boil for 2 hours, until beans are soft.

Meanwhile add the oil and your chile to a large skillet and heat on medium high for about 10-15 minutes. Be sure to turn on your vent fan as your chiles will start to smoke--this is where the flavor comes in! turn to low heat.

Once your beans are soft, drain excess water, you will need some water in your beans, but if it looks like more than a cup, best drain it. Now it's time to transfer your beans to the skillet. Make sure your oil is not scalding-hot by spritzing a little water in. if it pops and splatters, then wait for your oil to cool a little longer. You want your beans to simmer in the oil, but not burn and smoke.

Add your beans and everything else that was in the pot (onion/garlic) to the oil and begin mashing with a potato masher until beans are nice and smooth, add a little water if your beans look lumpy. Enjoy!

If you really want to go all out, make my Arroz De La Weda and Bacon Tortillas and I guarantee you'll be in a food coma!

Wednesday, July 6, 2011

Retro Glama...and Retro WTF

Imagine a time of innocence, a time of naivety, where women wore heels in the kitchen with made-up faces and A-line dresses. Imagine a world where political correctness was never necessary and where people kept their problems behind shut doors, a world before Entertainment Television and tabloid drama. Thoughts like this stream through my head as I flip through articles from the past stashed away in a file box and left for decades. The above pictures were my favorite WTF treasures I found, along with my absolute creepy fav on the right. Seriously, I think I saw this guy in the Megan's Law website! Oh! And Ken, with the crocheted outfit, including socks...you sure are dreamy too.

First, I have to thank my  hubbz' grandma for giving me some pretty amazing treasures! I was given a box full of crochet magazines and patterns dating back from the 1940's to 1980's. It was so much fun looking through all of these treasures. Just to think some of these patterns haven't been made or even glanced at since the Forties just boggles my mind!

Oh, and the ads! You should see the ads in these pamphlets, hilarious! So many, work at home selling greeting card ads, "Learn Shorthand!", "Become a Christian Writer!", and my favorite "Reduce! Keep slim...use Electric Spot Reducer!"- yeah, nice cover, this is like the retro version of the "back massager" shaped like a rod we all see in the back of Women's magazines today. Yeah honey, we know what you're going to do with that, and it's not being used for your belly...Wink, wink.

Oh dear, here are a couple examples of the lack of political incorrectness I referred to!
         Lucy was in heaven as soon as she pried
the lid of the musty old box from my hands.
She has a weird addiction to musty things.
Above are some of my favorite ads. Besides laughing at ads all day, I found so many cool patterns! Once I figure my way around a video camera, I may post a tutorial for a few of these, they are WAY too cool not to share.

Friday, June 24, 2011

Instant Girlification

Instead of randomly making crocheted scarfs and purses for nobody in particular, I decided to start concentrating my efforts on specific people...mostly so I don't have a lot of shit sitting in my closet, leaving me racking my brain wondering who to give it too.

I made Turdy the Turtle for my sweet nephew, and some random amigurumi strawberries for my crazy 9 year old niece (per request) and now I get to girly-up my littlest niece with some cute little headbands.

My Sister-In-Law has made it her personal quest to make her youngest daughter into a girly-girl; whether she likes it or not, damnit. ;) Since she has lost all hope for her older daughter (I believe I may have had a slight hand in facilitating her tomboyish, dirt-loving, anti-girly-girl persona) Emily is her only hope at having an actual girl to dress up in ruffles and lace.

 So, I made it my mission to help girlify her; the best part is I can do it practically for free since I'm using nothing but yarn scraps! Plus I have the most adorable model ever created, which makes the job a lot easier. Presenting Miss Emily, pronounced "Em-A-Yee" if you are gangsta like my three year old nephew :D.


Making headbands for my adorable neice is a breeze. Seriously, doesn't this little head scream for some sort of giant bow? I've found some really cute little patterns for crochet flowers and butterflies and thought I would share since they are SOOOO easy to make. If you have 10-20 minutes, you can make one of these. Don't know how to crochet? Niether did I four months ago. Here are some tutorials.

I found free patterns for small butterflies, flowers, etc. and then just stitched them to the crocheted band that I made from chain stiches, or single crochet stitches. You can also just hot glue them to a hair clip...but for babies with little hair, the headband works best. Bald is beautiful ;)

To make the headband, just measure the head, make that many chains or stitches, and fasten ends together. After I made a few of them I decided to get creative, I made up my own baby cupcake and flower designs (I put links to similar ones below) and bought rhinestones and cute little buttons (or as the hubbz says "cute, little, baby choking hazards") to ebellish with!

I made up the cherry pattern (seen up top) on my own. So to do it, just follow the "testicle" pattern I used for making the "wocket ship" lip balm cozy with red yarn, then make the stem from chain stitches in green yarn. Seems wrong...but nobody will ever know they were made from a testicle pattern :D

Here are the links to my favorite little designs:
Butterfly
Flower 1
Flower 2
Flower 3
Flower 4
Little heart
Cupcake


Go Ag!