Tuesday, November 30, 2010

Merry Xmas: Create Your Own Non-Traditional Tradition

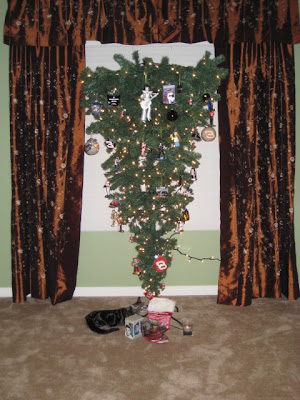
Old Ladies At Heart definitely aren't expected to be old fashioned at mind. For some, Christmas is about doe eyed, sticky-fingered children, presents, and Santa standing over the baby Jesus's manger while he eats a Christmas tree flavored candy cane and sings Jingle Bells. This is okay...for most, but not for me. For those that don't know me personally I am a realist, I enjoy factoids and researching, I enjoy peeling back the layers of something, even if it's something as sacred as Christmas. So every year my Xmas consists of bringing in elements of my crazy, unconventional mind into my home and creating my very own non-traditional tradition. Decorating for the holidays is about expressing oneself, not conforming to what is expected of the masses...This is my manifesto. Two years ago, my husband and I had an upside down Christmas tree, which was perfectly unconventional yet still safe in that grandma wouldn't be offended if she dropped by. It definitely sparked some interest, especially from our cat, Lucy Fur. Scared that Lucy would divide and conquer our top-heavy tree, we decided to retire it after two years.

Next, came our Charlie Brown Christmas Tree which was a refreshing $10 and still made a nice statement of unconventionality.

This year, thinking of my blog and "doing more things from scratch," I decided to make my own unconventional ornaments to adorn a very traditional Christmas tree, and it would be WAY cheaper than buying a bunch of expensive ornaments. The hubby and I cleared the cobwebs from our pockets and shelled out 100 freaking dollars for a fake, pre-lit, plastic, freaking tree...and that was the sale price! I suggest going the day after Christmas, or scouring yard sales instead, but I didn't plan that far ahead. Next I had to think of a theme, and the first thing that came to my mind was "The Evolution of Xmas." I've always had mixed feeling about Christmas, as a child my greedy little fingers couldn't open my presents fast enough. Then I learned about the whole 'Jesus is the reason' shtick, which is a nice thought, but not completely true. I was then betrayed by a fake Santa...I guess that was the time when I started to realize my parents didn't know everything, and my undoubted faith in them, and faith in general began to unravel. Through readings and research I learned how a lot of pagan traditions were inserted into the Christmas tradition in order for it to be a more palatable medium for converting the 'devil worshippers,' and even how the date of the supposed birth of Christ was just a speculation, and purposely chosen to coincide with the Pagan holiday of Yule and the Winter Solstice. Then we can't forget how pagans were converted through brute force, fear tactics, and bloodshed in the Holy Crusades. So viola! There is my tree concept.

I had some photo paper laying around, so I got on my trusty Yahoo! Images search and typed in a few phrases and got some really cool pictures, which I copy and pasted into a Microsoft Word doc., sized them to my liking, and printed them on photo paper. Key phrases I used were: 'Pagan,' 'Green Man,' 'Pagan holiday,' 'Crusades,' 'consumerist Christmas,' xmas', 'consumerism Christmas,' corporate Christmas.' Here are some of my favorite's that I found.


Then I went to the craft store and got some scrap booking paper that came in an assorted pack of shiny black, brown, silver, and white paper(expensive! How does anyone afford scrap booking as a hobby?!). I cut out my pictures, glued them with a paste stick to a whole sheet of scrap booking paper, being sure to leave enough room for a border and trying to put similar sized pics in a line so the cutting process could be streamlined. Then I cut them out using a paper cutter and used a hole punch to leave a place for ribbon or hanger. Stupid me didn't foresee how many pictures I was going to make, and ran out of ribbon, so I just used regular ornament hangers for the rest of them. So below is my final product, finished with a garish, ironic bow. Starting with pictures of pagan related items on top, crusades in the middle, and ending with baby Jesus, then presents, Disney characters, wads of money, and pictures of Santa telling you to "Spend!" My favorite Xmas tree to date, and the whole thing only cost about $20 to decorate. So moral of the story, be creative this year! It's cheap, and much more satisfying than putting out the craptastic, meaningless ornaments you have been recycling each year.


*Amended since first published:
My grandma shared a really cool story with me yesterday. She said, growing up, she never had store-bought ornaments or lights. She is the baby of nine kids and told me all year long the kids would save the foil that came from the cigarette wrappers from their older siblings (everyone smoked back then!) and they would cover the "prickly balls" from maple trees with the foil, string popcorn on string and paint pine cones to decorate their tree every year. I thought this was such a cool idea, to know that even a family who didn't have much money could all pitch in, kids and all, to make a really cool Christmas tradition. Which reminds me, if you have kids, or plan on having kids, always include them in the decorating. That was one of my fondest memories as a kid. I would get out my Chipmunk's Christmas record and my mom and I would decorate the tree with ornaments I made in school while listening to Alvin and The Chipmunks.

PS: I also loved making our Xmas card this year! I made this by finding a Grinch pic on Yahoo!, then used Photoscape (A free photoshop program I found on PC World) to insert our pictures and text, and there ya go. Personalized Xmas cards that didn't cost me one red cent. Love it!

UPDATE: Found a cool blog post from a friend who has made it her goal to look up some crazy Xmas traditions all over the world. Click here to find more about pickle ornaments and the "Poop Log..."

Wednesday, November 24, 2010

The Last Gasp Of Summer

Tonight is the night. My innocent summer garden survivors, the ones who have overcame summer heat and chewing petulant insects, the ones who have done nothing but give, only to watch neighboring plants being rooted up one by one as they withered in the summer sun; the ones who provided baskets and barrels full of earthy goodness, tonight is the night they will be slaughtered. Yes, the first winter frost is on the move and tonight it will be hitting my summer weaklings until they are frozen to the core. I feel kind of dirty as I fill up my grocery sack full of green tomatoes, the poor plants can't even see it coming; stealing their little babies one by one, raping and pillaging...I'm a pirate now, and my garden is the unsuspecting, innocent village.


Well...a little dramatic I suppose; but since gardening isn't the edgiest thing in the world sometimes you have to use your imagination. Might as well make the most of it! I'm a pirate after all, now I must enjoy the bounty of my pillage :)

Recipes for Green tomatoes:
Green Tomato Salsa Verde
Green Tomato Pickles
Fried Green Tomatoes
My Dad's favorite: Chow-Chow

Scarlet Pepper Jelly 

1 lb peppers (mix of red and green peppers, whatever kind you got, depending on desired hotness) I use a ratio of 1:1 half sweet/mild peppers, then half a mix of Jalapeno and Serrano
3 1/2 cups apple cider vinegar
6 1/2 cups sugar
1 pouch powdered pectin

Yields 6  1/2pints

Wash peppers and cut off tops. Core mild peppers only, leave hot peppers intact, seeds, membrane, and all. If you want to "sissify" your jelly, You could de-membrane and seed everything though. Puree peppers on the "chop" setting on your food processor. Transfer mixture to a large pot and add the vinegar. Heat to boil and boil for 10 minutes, stir constantly occasionally. Add pectin and stir until dissolved. Add sugar to your mixture, and bring to boil. Boil for another 10 minutes, stirring constantly. Ladle immediately into hot, sterile jars and process in your water-bath canner according to USDA processing times (in Bakersfield, I process my hot-packed jars for 10 min) . Remove and let cool for 24 hours on a towel.

 Use for poultry glaze, add more vinegar to make a spicy poultry or fish marinade, or enjoy with some cream cheese on a cracker. Delicioso!

Friday, November 19, 2010

Taming the Devil Fruit

Using fruits and vegetables that are in season is the most cost efficient, most tasteful, and environmentally responsible way to create delicious masterpieces. So for the month of November, just say no to ethylene gassed tomatoes from Mexico and hello to a succulent head of locally grown cabbage. Put down the sour strawberries and hard peaches and reach for a cinnamony-sweet persimmon or tart, juicy pomegranate. I love the tastes of Fall, they have a certain sophistication about them, a more savory texture, and deep, rich flavor. Since a lot of people who I talk to have never heard of persimmons and have no idea what wonderful things they are used for, I will devote a blog to them. Here's to the persimmon!


My first experiment with a persimmon was quite unfortunate. I had always heard of people making persimmon cookies and bread, but wondered why I had never heard of anyone eating them raw. This was before I learned there are two types of persimmon that are commonly grown: a persimmon used mostly for baking and a persimmon that's okay to eat raw. So, thinking I may be on the brink of discovering something wonderful, I bit into a baking persimmon (the larger, apple shaped kind). Immediately I had realized I made a horrible decision and made that move a cat does as it rejects a pill. Yeah, pretty nasty. I can't remember the taste, I just remember my tongue and throat feeling like I just tried to eat cactus with spines in tact. Bad times.

I made persimmon cookies with the rest of the evil, round devil fruit, and those were pretty bad ass if I do say so myself :) The trick is to not use them until they are really mushy on the outside and jelly-like on the inside. The kind of persimmon used for baking, the Hachiya persimmon, has high levels of tannins that only break down when it is ripe. If not allowed to ripen, the tannins, which are a bitter polyphenolic compound produced by plants, will still be present and will cause your mouth to pucker from it's bitter dryness. This is a lovely defense mechanism certain plants have evolved to insure their seeds will be distributed at peak maturity. This is also the same substance responsible for sour grapes. Gotta love the way mother nature works.

I found out later there is a type of persimmon that has low levels of tannins and can be consumed when it's still pretty firm, these are Fuyu persimmons. They are more flat than the Hachiya persimmons and kind of shaped like little pumpkins. These, you can eat like apples, or you can bake with them, they are pretty versatile. I found some pretty interesting recipes on this site and plan on trying a few of these. One that I will be trying and will have to post a follow up is the dried persimmon. Apparently you can dry the devil fruit kind, it's actually a delicacy in Japan, but it takes four to six weeks. So maybe you guys out there can try it too and we can compare results next month.
UPDATE: Dried persimmons are so yummy! So easy too, take an unripe Hachiya persimmon (orange, but hard to the touch), peel the skin off with a sharp knife, leave the leafy cap (calyx) intact. Tie string around cap, and string up in a dry place until it dries completely. Cut it up and use on salads, or eat it as is.

For this blog I will be making some persimmon jam out of  Fuyu persimmons (the flat kind, not the evil kind) since my Hachiya persimmons aren't even close to being ripe yet. I found a really great community of excellent cooks and home preservers at http://www.food.com/ so I am using a tested recipe for Persimmon Freezer Jam that I found on the website.
Fuyu Persimmon

So, I tried the recipe above, and instead of making freezer jam I decided to can it so I could store it for later in the year. In hindsight, I think that was a bad idea because when I brought the mixture to a boil so I could "hot pack" it into the jars a bunch of air bubbles formed in my jam mixture :( But...it still tastes really good, so not a big loss! It's really an interesting jam, never tasted anything quite like it before. It will go great with some homemade biscuits slathered in butter...Mmm. I used a potato masher to break up the persimmon pieces which worked quite nicely, but I think next time I will wait until my persimmons are nice and ripe because they turn to a goopy, booger like consistency...which isn't so great to think about eating, but works great when making jam or cookies because you don't have to do any mashing.  You've got to try a persimmon if you never have before, you truly suck if you don't, and you are totally missing out. 'Tis the season for sophisticated fruit and an excuse to throw the dieting out the window (seriously, it's winter, baggy clothes easily conceal the muffin top until you start working out again). So, say a toast to your new found love for Fall fruit with a Pom-tini and go heavy on the pumpkin and persimmon desserts this holiday season.

My Persimmon Jam


Besides the Pom-tini linked above here are some other incredible Fall recipes with seasonal fruit, have fun!
The Masters of the Pomegranate-POM Wonderful
Persimmon recipes
Pumpkin recipes

Monday, November 8, 2010

Love, Peace, and Bacon Grease


Every Old Lady At Heart should have a jar or butter tub full of bacon grease at her disposal. Granted, it's not the healthiest substance in the world, but it makes a heavenly addition in your cooking every once in a while. Sounds disgusting in it's own right, but let's be honest, Shortening, which is used in a lot of the same applications as bacon grease, is in most ways worse for you and totally unnatural. So when making a choice between the lesser of two evils, bacon grease wins hands down. You can substitute bacon grease for just about anything savory that you would put shortening or oil in: biscuits, fried potatoes, potato cakes, hoe cakes,  green beans, corn bread, tortillas, and I've even heard of people using it in their cookies....bacon chocolate chip anyone?

Since tortillas are probably one of the easiest things you can make from scratch, I will dedicate this blog to all of those, like me, who are short on time, but still want to experience great tasting, homemade food. For the perfect tortilla all you need is some flour, shortening or bacon grease (Hey, I never said they are the healthiest things you can make, did I?), a little bit of salt and water. I always use bacon grease in my flour tortillas because it gives it a nice smoky flavor. Plus shortening has a lot of hydrogenated oils which I try to stay away from. What exactly is wrong with hydrogenated fats? Hydrogenation is the result of a reaction between added hydrogen molecules to unsaturated, fatty liquids in the presence of a catalyst in turn creating a saturated fat. This turns the oil into a semi-solid form at room temperature and increases its shelf-life. Bacon grease is 40% saturated fat and 114 calories per tablespoon, and shortening is pretty much the same caloric-wise. So if you suffer from high cholesterol, you may want to make your tortillas with canola  or olive oil. If not, bring on the bacon!


My grandma (and this goes for me now that I am a 'seasoned' tortilla maker) never measures ingredients when making tortillas, once you do it long enough (which for me it was about a half-dozen times), you can just "feel" when the dough is perfect. So of course when I asked her for her recipe she just laughed at me...so I took to the Internet and found a recipe and then tweaked it to my liking. Here it is:

Disclaimer: Everything I said about going topless in the kitchen is null and void when working with bacon! Maximize clothing articles until you obtain the dripping from your bacon, then, when it is safe, discard clothing and proceed. :)

Flour Tortilla Ingredients
3 Cups flour
1/3 Cup bacon grease
1 Tbsp salt
1 Cup warm water

Pretty straight forward right?  So tell me, why do tortillas you buy at the store have a paragraph worth of ingredients? Yes, that' correct...it's because store bought tortillas suck; once you have had a homemade tortilla you will concur, trust me! Plus it's way cheaper, and you are recycling (bacon grease that you would have thrown away in the past) at the same time. So, next time you make BLT's, save the bacon grease, no need to filter out the bits in the grease either, that's just extra flavor! Not a fan of bacon (Don't worry, I won't judge)?  Just use shortening or oil, you will get the same great texture without the added bacon flavor.

So let's get started with our easy flour tortillas: Mix your flour and salt in a medium sized bowl, just use your hand and stir everything around. Next add your bacon grease and water, and mix with your hands (This is a great activity if you have kiddies at home!) After everything is mixed and sticky, begin to knead the dough (see video below). Trying to cut overhead costs, I was my own cameraman for this video, notice the one-handed kneading. Normally I would use the other hand to steady the bowl for reasons you will be able to note from this video. Not normally that slow or awkward, haha!


Your dough should be soft and squishy, easy to knead, but not sticking to your fingers after a minute or so of kneading. If your dough is too sticky add a little more flour, if it's too stiff, add more water. Knead until your dough isn't lumpy and you can no longer see streaks or blotches of grease. Then put some plastic wrap over it and let it rest for about 20-30 minutes (this time isn't crucial, so if you are making dinner or in the middle of something, your dough can wait). Now for the most important step! Pinch off an inch size piece of dough and knead it in one hand, 12 times, with your thumb and fingers (This is what makes your tortilla soft and chewy, see video below for demonstration). Then roll it in a ball and gently flatten that ball with your palms. Do this to the remainder of the dough, and just put the flattened balls in the same bowl you had the dough in. Cover with plastic wrap and let sit for 5-10 minutes.


Next, prepare a flat surface to do your rolling on. Sprinkle flour over surface and rub some on a rolling pin. My great grandma used to use a piece of a broom handle...but I will be using a rolling pin :). Take one of your tortilla dough pancakes put in in the middle of your floured surface and gently roll one way. Pick the tortilla up and rotate 90 degrees, roll the other way. The trick to getting pretty, round tortillas is a gentle roll and rotation after every roll in one direction. I haven't mastered this yet and still make crazy looking, oblong tortillas but they still taste really good and if I'm lucky, maybe one will look like the baby Jesus and I can make some money on Ebay :).
The tortilla above was the result of a mistake I made when trying to cut corners. Trying to save time, I rolled out one tortilla, and my skillet was taking forever to heat up, so I just kept rolling them out and stacking them -thinking the flour on the outside would prevent them from sticking until I could get them in the skillet- bad move! All my tortillas stuck together when the bacon grease began to seep and soak up the flour. Whoops, now I had a tortilla layer cake who's layers would not be dismantled. What a mess, not wanting to roll them out again I tried salvaging a few, and the above picture was one of those I managed to save. Lesson learned! Be patient and do one at a time, or stack them between wax paper.


While you are rolling out your dough, heat a comal (Flat cast iron skillet used in Mexico), or just a regular cast iron works fine too -This is what I use). If you don't own either, any old skillet will do. Once you have your first tortilla rolled out, throw it on the skillet. Flip when the bottom turns from translucent to white and little tan marks start to form. While you are waiting to flip your tortilla you can start rolling out the next one.  Wrap finished tortillas in a towel or tortilla warmer. Now you can crack the top on your favorite Mexican beer and enjoy!
So there you go, easy right? Your dinner guest's eyes will be rolling back into their heads. Now all you need is some Mexican rice and some authentic frijoles and your life will be complete. That blog will be coming soon!